


It’s getting chilly outside as the leaves start to fall. As we get ready to hunker down to spend more time indoors, let’s try some DIY’s that bring the outdoors in, wrap you in warmth, and slow things down just a little.
Sweater Poofs
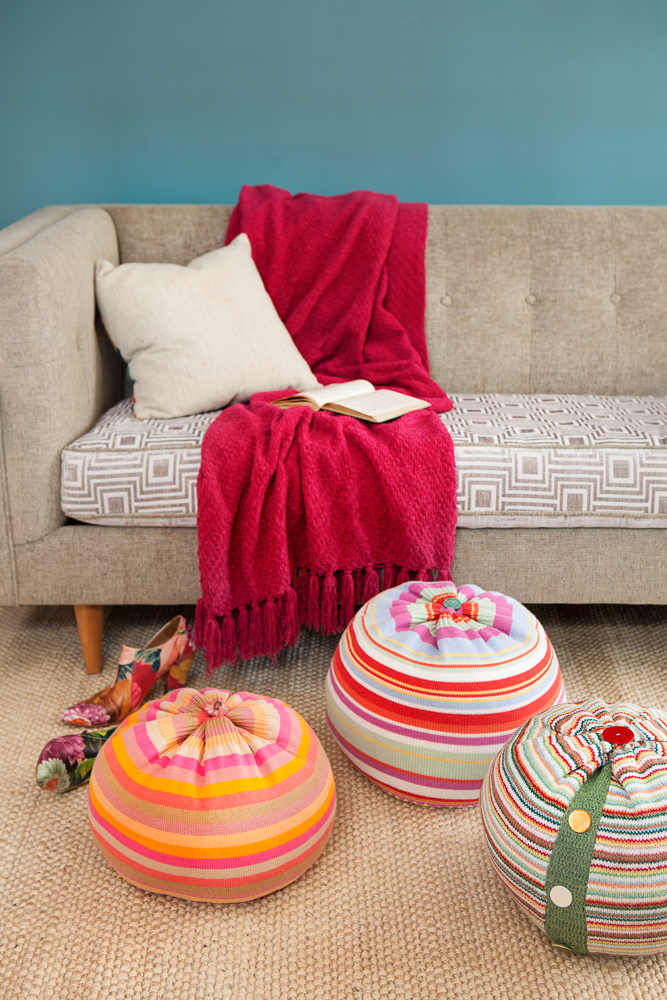
It’s sweater season. This DIY turns your cardigans into accent furniture. Think of a beanbag concept on a smaller scale — like a mini ottoman. All you have to do is remove the sleeves (see sweater vases for their use), sew up the arm and neck holes, turn the sweater upside down, add beanbag filler, and sew the bottom hem up. Functional fashion at its finest.
Supplies:
– Sweater
– Scissors
– Needle
– 50-weight quilting thread
– Beanbag filler
– Large button
– Optional: Sewing machine to sew the armholes closed
How To:
- Cut the sleeves off the sweater.
- Turn the sweater inside out and stitch the arm holes closed (by hand or sewing machine).
- Turn the sweater right side out.
- Tie a knot on the rim of the neckline and then weave the thread in and out around the neckline in small increments.
- Gently pull the neckline until the hole is as small as possible and then thread at all four corners overlapping the hole. At the same time, pull the fabric close together. This will close the hole entirely. This is the bottom of your sweater poof.
- Fill the sweater with beanbag filler.
- Close the bottom of the sweater by repeating steps 4 and 5.
- Stitch the button over the top center of the sweater poof.
Twig Letters
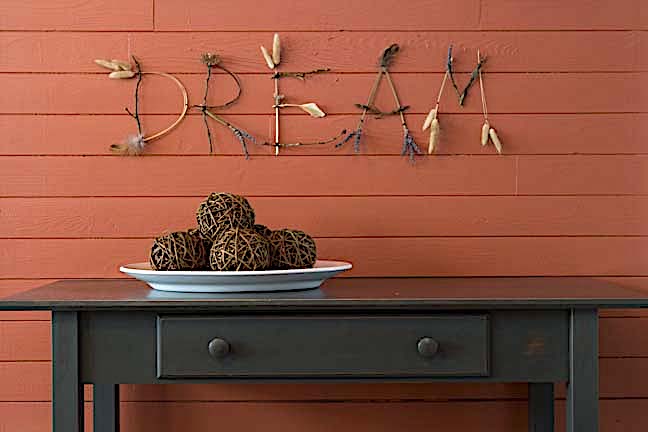
Next time you head out the door, why not grab a bag and go for a nature walk to start the next DIY? Gather twigs, dried flowers, stems, leaves, small pinecones, or anything else that catches your eye. Bring them inside, clean them, let them dry and organize them into piles. Now, think of a favorite word that you want to make, or maybe just one letter. Pick from the bunch and with needle nose pliers start to mold and bend these organic materials into your desired letter. To secure their shape, use wire around the letter joints. To hide the wire, add small petals or grains over the exposed wire.
Supplies:
– A variety of twigs, dried lavender, wheat, and feathers
– Hand shears
– 24 gauge dark steel wire
– Needle nose pliers
– Glue gun
– Glue sticks
How To:
- Choose items that look similar to partial shapes of the letter you want to create.
- Place items over each other to form the letter(s).
- With the needle nose pliers, wrap and secure steel wire around each connecting point of the letter.
- Use glue to add dried flowers, moss, or small pine cones. This adds layers of decorative detail.
- Repeat the same process for each letter to create your desired word.
Note: These are very delicate and must be handled with care.
Motel Artwork Postcards

As the days get shorter and the nights get longer, sending a quick thank-you or thinking-of-you note will brighten anyone’s day. All you need is cardboard artwork, (an abundance can be found at any thrift store) a paper cutter, ruler and a black felt pen. It’s an inexpensive DIY that quickly becomes priceless.
Supplies:
– Ruler
– Cardboard Artwork
– Paper Cutter
– Pencil
– Black Felt Pen
How To:
- On the backside of the cardboard artwork, measure and mark a 4”x 6” grid with a pencil.
- Cut the artwork into these postcard sizes.
- On the backside of the artwork postcards, write “From” in the upper left-hand corner and write “To” in the center, with the black felt pen. You can also draw some writing lines near the “from” and “to” if you’d like.
Sweater Vase
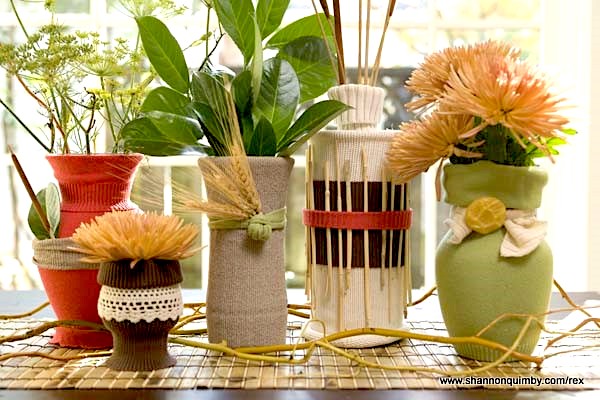
Clear glass vases are a dime a dozen. The same goes for sweaters. Instead of tossing them out or before giving them away, why not have a little Autumn DIY fun? Grab a couple of sweaters you no longer wear, a vase, and a pair of scissors. Cut the sleeves off the sweater and slip that sleeve over the vase. Continue the same process by layering shorter sleeve sections over one another. If the vase has a neck, you can secure the sweater with a rubber band. Attach decorative Autumn accents with a glue gun and then stand back and admire your new Fall DIY décor.
Supplies:
– Glass vase with rim
– Variety of solid-colored sweaters
– Rubber bands
– Scissors
– Glue gun
– Glue sticks
– Twigs, wheat, large buttons for decorations
How To:
- Cut one sleeve off of a sweater at the shoulder.
- Pull the sleeve over the vase, leaving some of the sleeve hanging over the top of the opening of the vase.
- Take the rubber band and wrap it over the sleeve at the neck of the vase. This will hold it in place.
- Roll down the remaining part of the sleeve exposing the opening of the vase.
- Cut a small section of another sweater sleeve and slip it over the sweater that is covering the vase.
- Tuck twigs or pieces of wheat between the sections of sweaters. You might consider gluing them in place.
- Another cute accent: stretch the small piece of sweater and tie it in a knot and glue a large button near the knot.
Couch Armrest
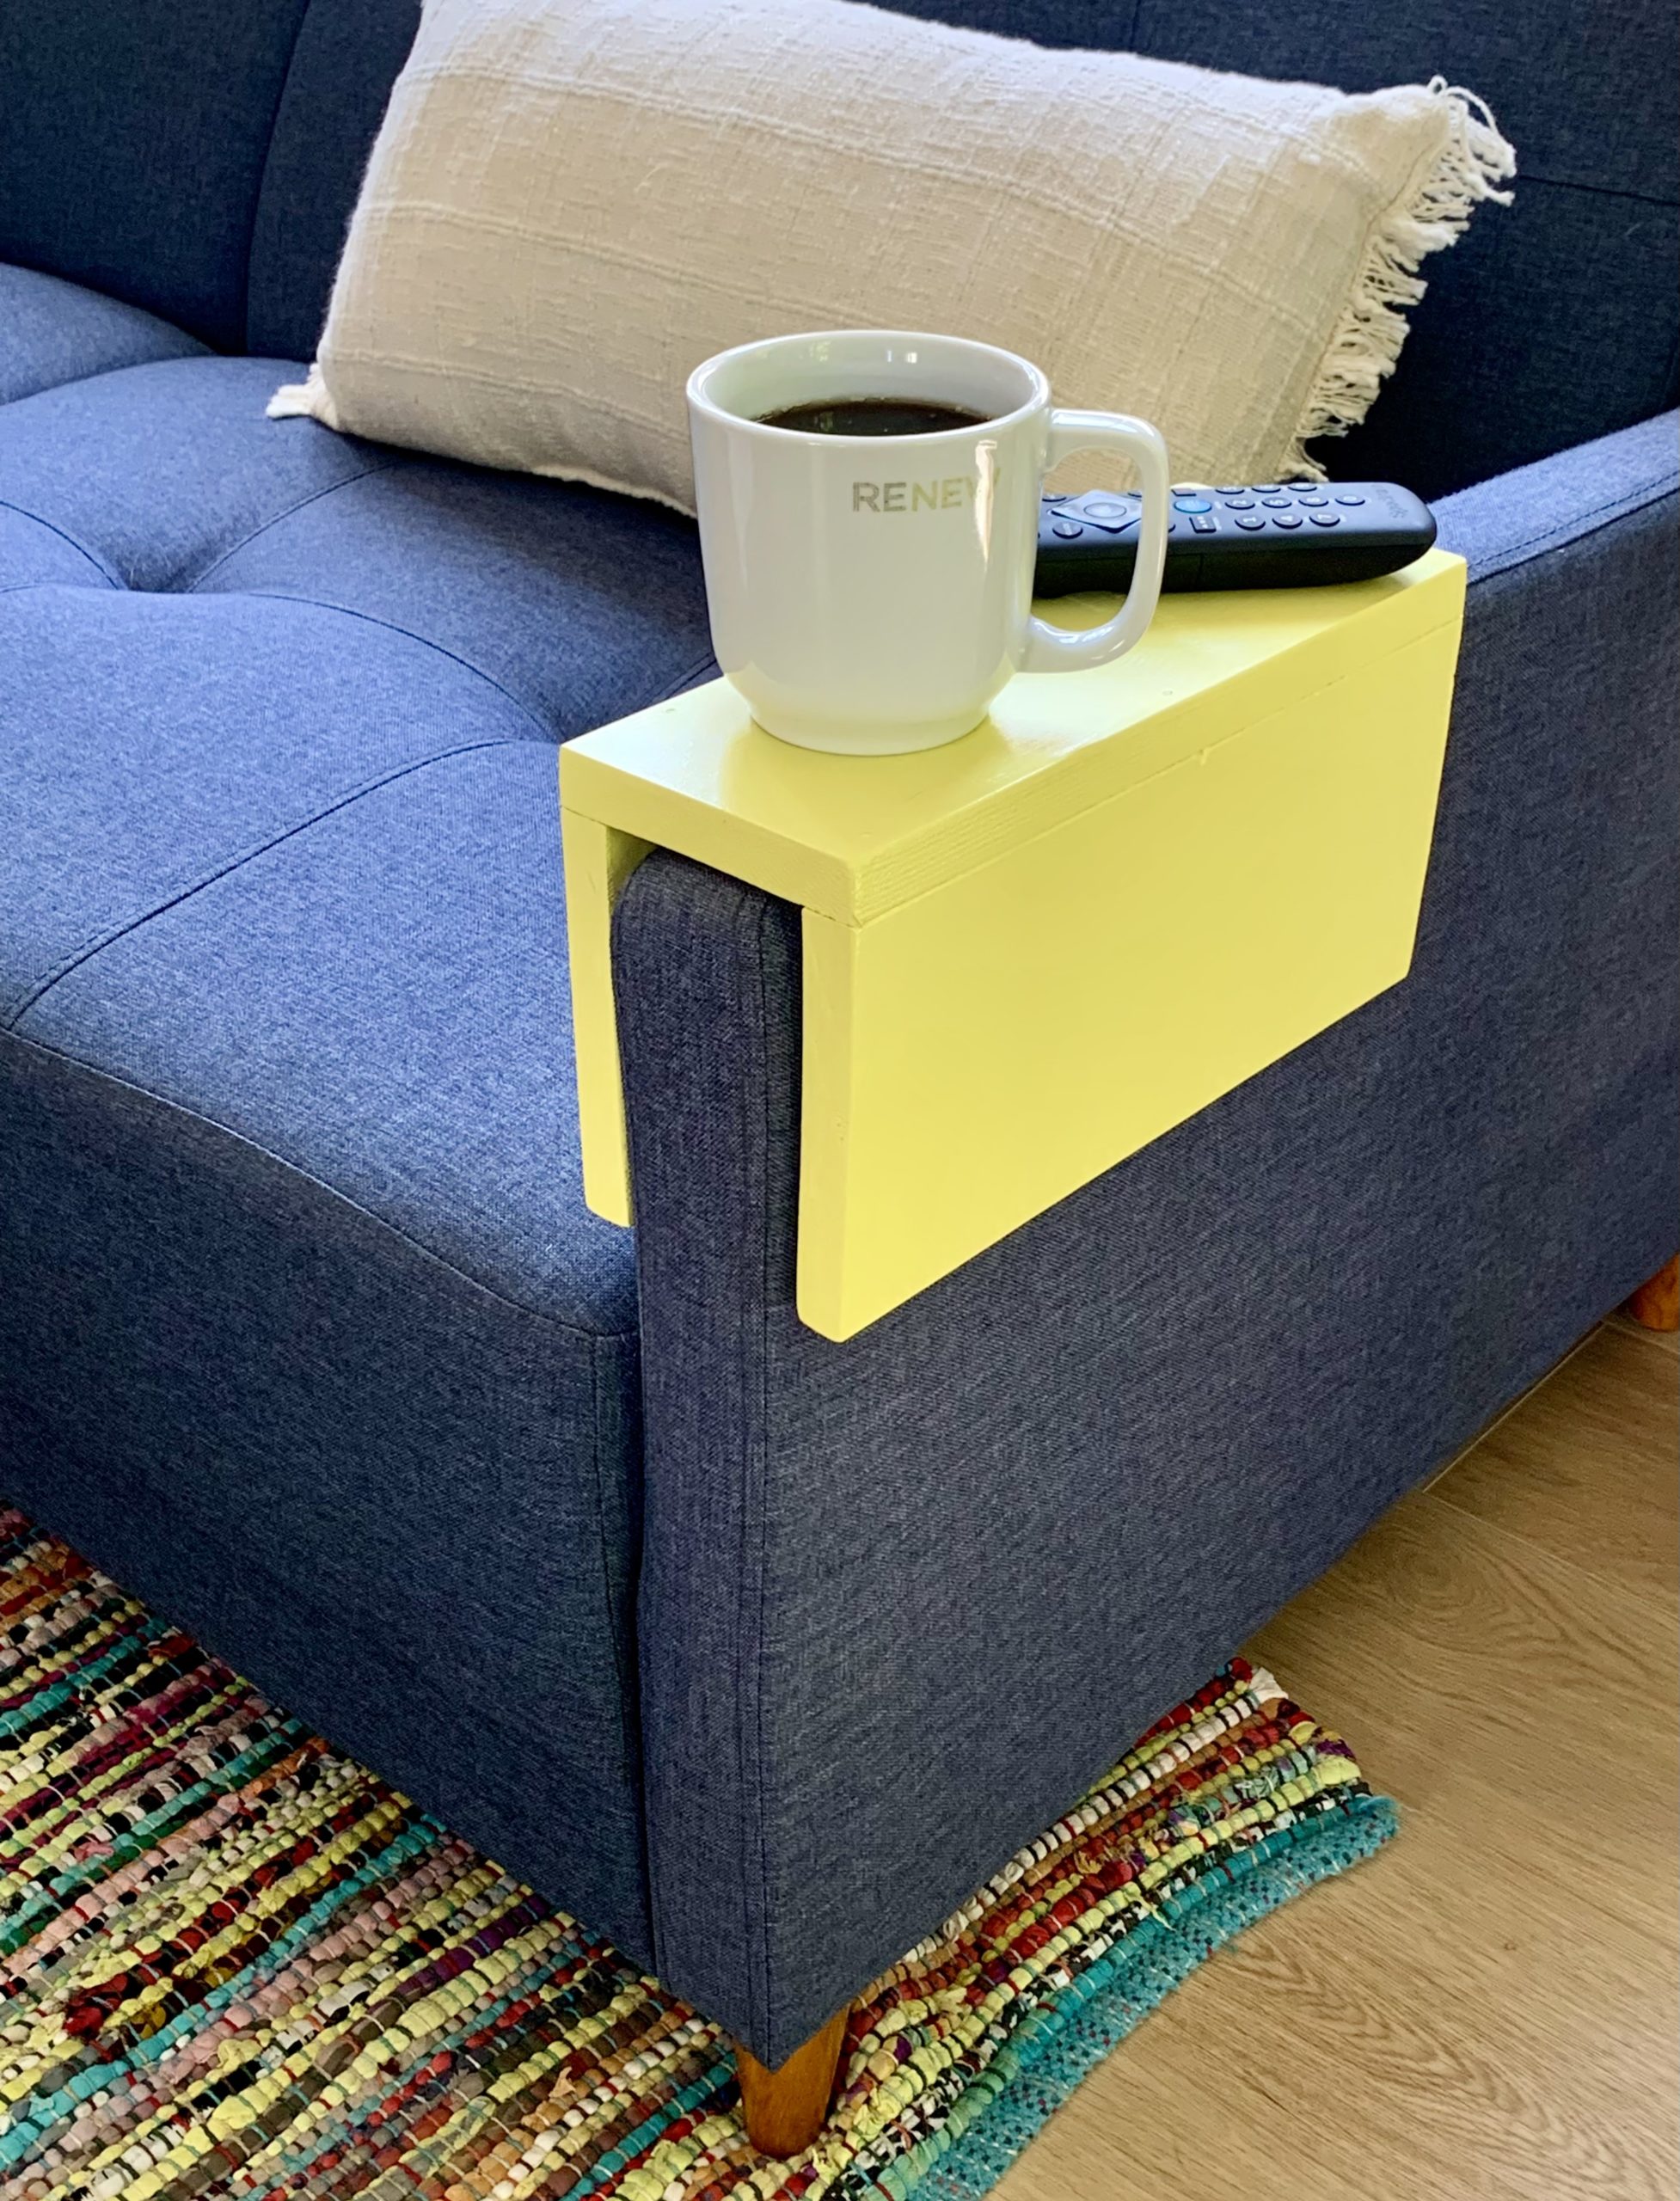
It’s a little frustrating when you sit down on the couch (drink in hand) to watch TV but have no place to set your beverage. This DIY fixes everything. Grab a ruler, three boards, some glue, a half dozen finish nails, and a hammer. And if you want to be fancy, find paint to match the room’s décor. Follow these easy instructions and in less than a half hour, you’ve DIYed a custom couch armrest. Now if only, you can find the remote.
Supplies:
– Wood of your choice that will be cut into three pieces
– Wood glue
– Miter saw
– Pencil
– Tape measurer
– Sandpaper
– Rag
– Drill
– 1/16” Drill bit
– Hammer
– Six 2” finish nails
– Paint
– Paintbrush
Note: This project uses three boards. Two boards for the sides; 1 x 4 ½” x 12” and one board for the top; 1 x 5 ½” x 12”.
How To:
- Measure the width of your sofa or chair to determine the flat surface board. Be sure to add 2¼”. (2” for the width of the side boards and ¼” for an easy fit)
- Using a miter saw, cut boards according to your measurements.
- Sand edges and wipe away any dust.
- Pre-drill three holes lengthwise on each side of the top board.
- Glue and nail the two side pieces to the top board in a U-shape and let dry.
- Paint the entire piece (two coats might be needed) and let dry.
Windowpane Fireplace Screen

We all enjoy sitting by the fireplace, absorbing its warmth and listening to the crackling sound of burning wood. What’s not so pleasant is looking at a black ash-filled firebox once the flames have gone out. This DIY makes it pretty. You’ll need an old window that is slightly bigger than the firebox opening, a variety of paint colors (Interior paint works well), and a wax pencil. Clean the entire window and have fun drawing and painting your original artwork on the glass panes. Once dried, stand the window upright and drill in shelf brackets on both sides of the bottom corners. When the fire is cold, place your windowpane fireplace screen in front of the firebox. It’s a beautiful home accessory that blocks the burn pile.
Supplies:
– Window slightly larger than the opening of the fireplace
– Four shelf brackets
– Screws
– Drill
– 3 to 5 colors of paint
– Various sizes of small paintbrushes
– Wax pencil
How To:
- Clean glass and prep wood frame to paint.
- Paint window frame and let dry.
- With the wax pencil and various paint colors, paint your design directly onto the glass panels. Let dry in between coats.
- Stand the window up and screw brackets on both bottom corner sides. This allows it to stand up by itself.
Note: Remove the window frame from the front of the fireplace when using.
Doorknob Candles

Knock, knock. Who’s there? Candle. Candle who? Candle you handle this DIY? Yes, of course you can. First, get a doorknob. Next, stick a skinny candle inside the opening. And finally, stand it up. Repeat to make more. Then perch them on top of a pile of small pebbles. That’s all it takes to shine a little light on a dreary fall day.
Supplies:
– A variety of glass, ceramic and brass doorknobs
– Skinny thin dripless candles
– Small pebbles
How To:
- Remove any screws or spindles from inside the doorknob.
- Clean any debris from the doorknob.
- Set the candle inside the doorknob hole.
- Pile and spread pebbles into a messy rectangle shape.
- Place doorknobs randomly on top of pebbles.
Vanity Lightbar Centerpieces

Are you planning a bathroom remodel this Fall? If so, don’t toss out that ugly, outdated vanity lightbar. Instead, salvage it. By removing all the electrical components and getting candles that are the same diameter as the lightbulb base, you can DIY an illuminating tabletop centerpiece. It’s a great way to save money and shed new light on an old fixture.
Supplies:
– Vanity light fixture
– Candles (a variety of sizes can be found at craft stores)
– Adhesive putty
– Wire clippers
– Screwdriver
– Nuts, bolts, and washers that fit the size of the light fixture opening
How To:
- Remove the electrical components of the light fixture.
- The individual light sockets might need to be reattached with new nuts, bolts, and washers. Recommend taking the light fixture base to the hardware store so you can find the correct diameter and lengths of the hardware needed. Screw light sockets back together again.
- Place candles inside the sockets.
- Optional: To keep candles standing straight up, use putty (recommend Elmer’s Tac ‘N Stik adhesive putty) around the candle.
Leather Bookmarks
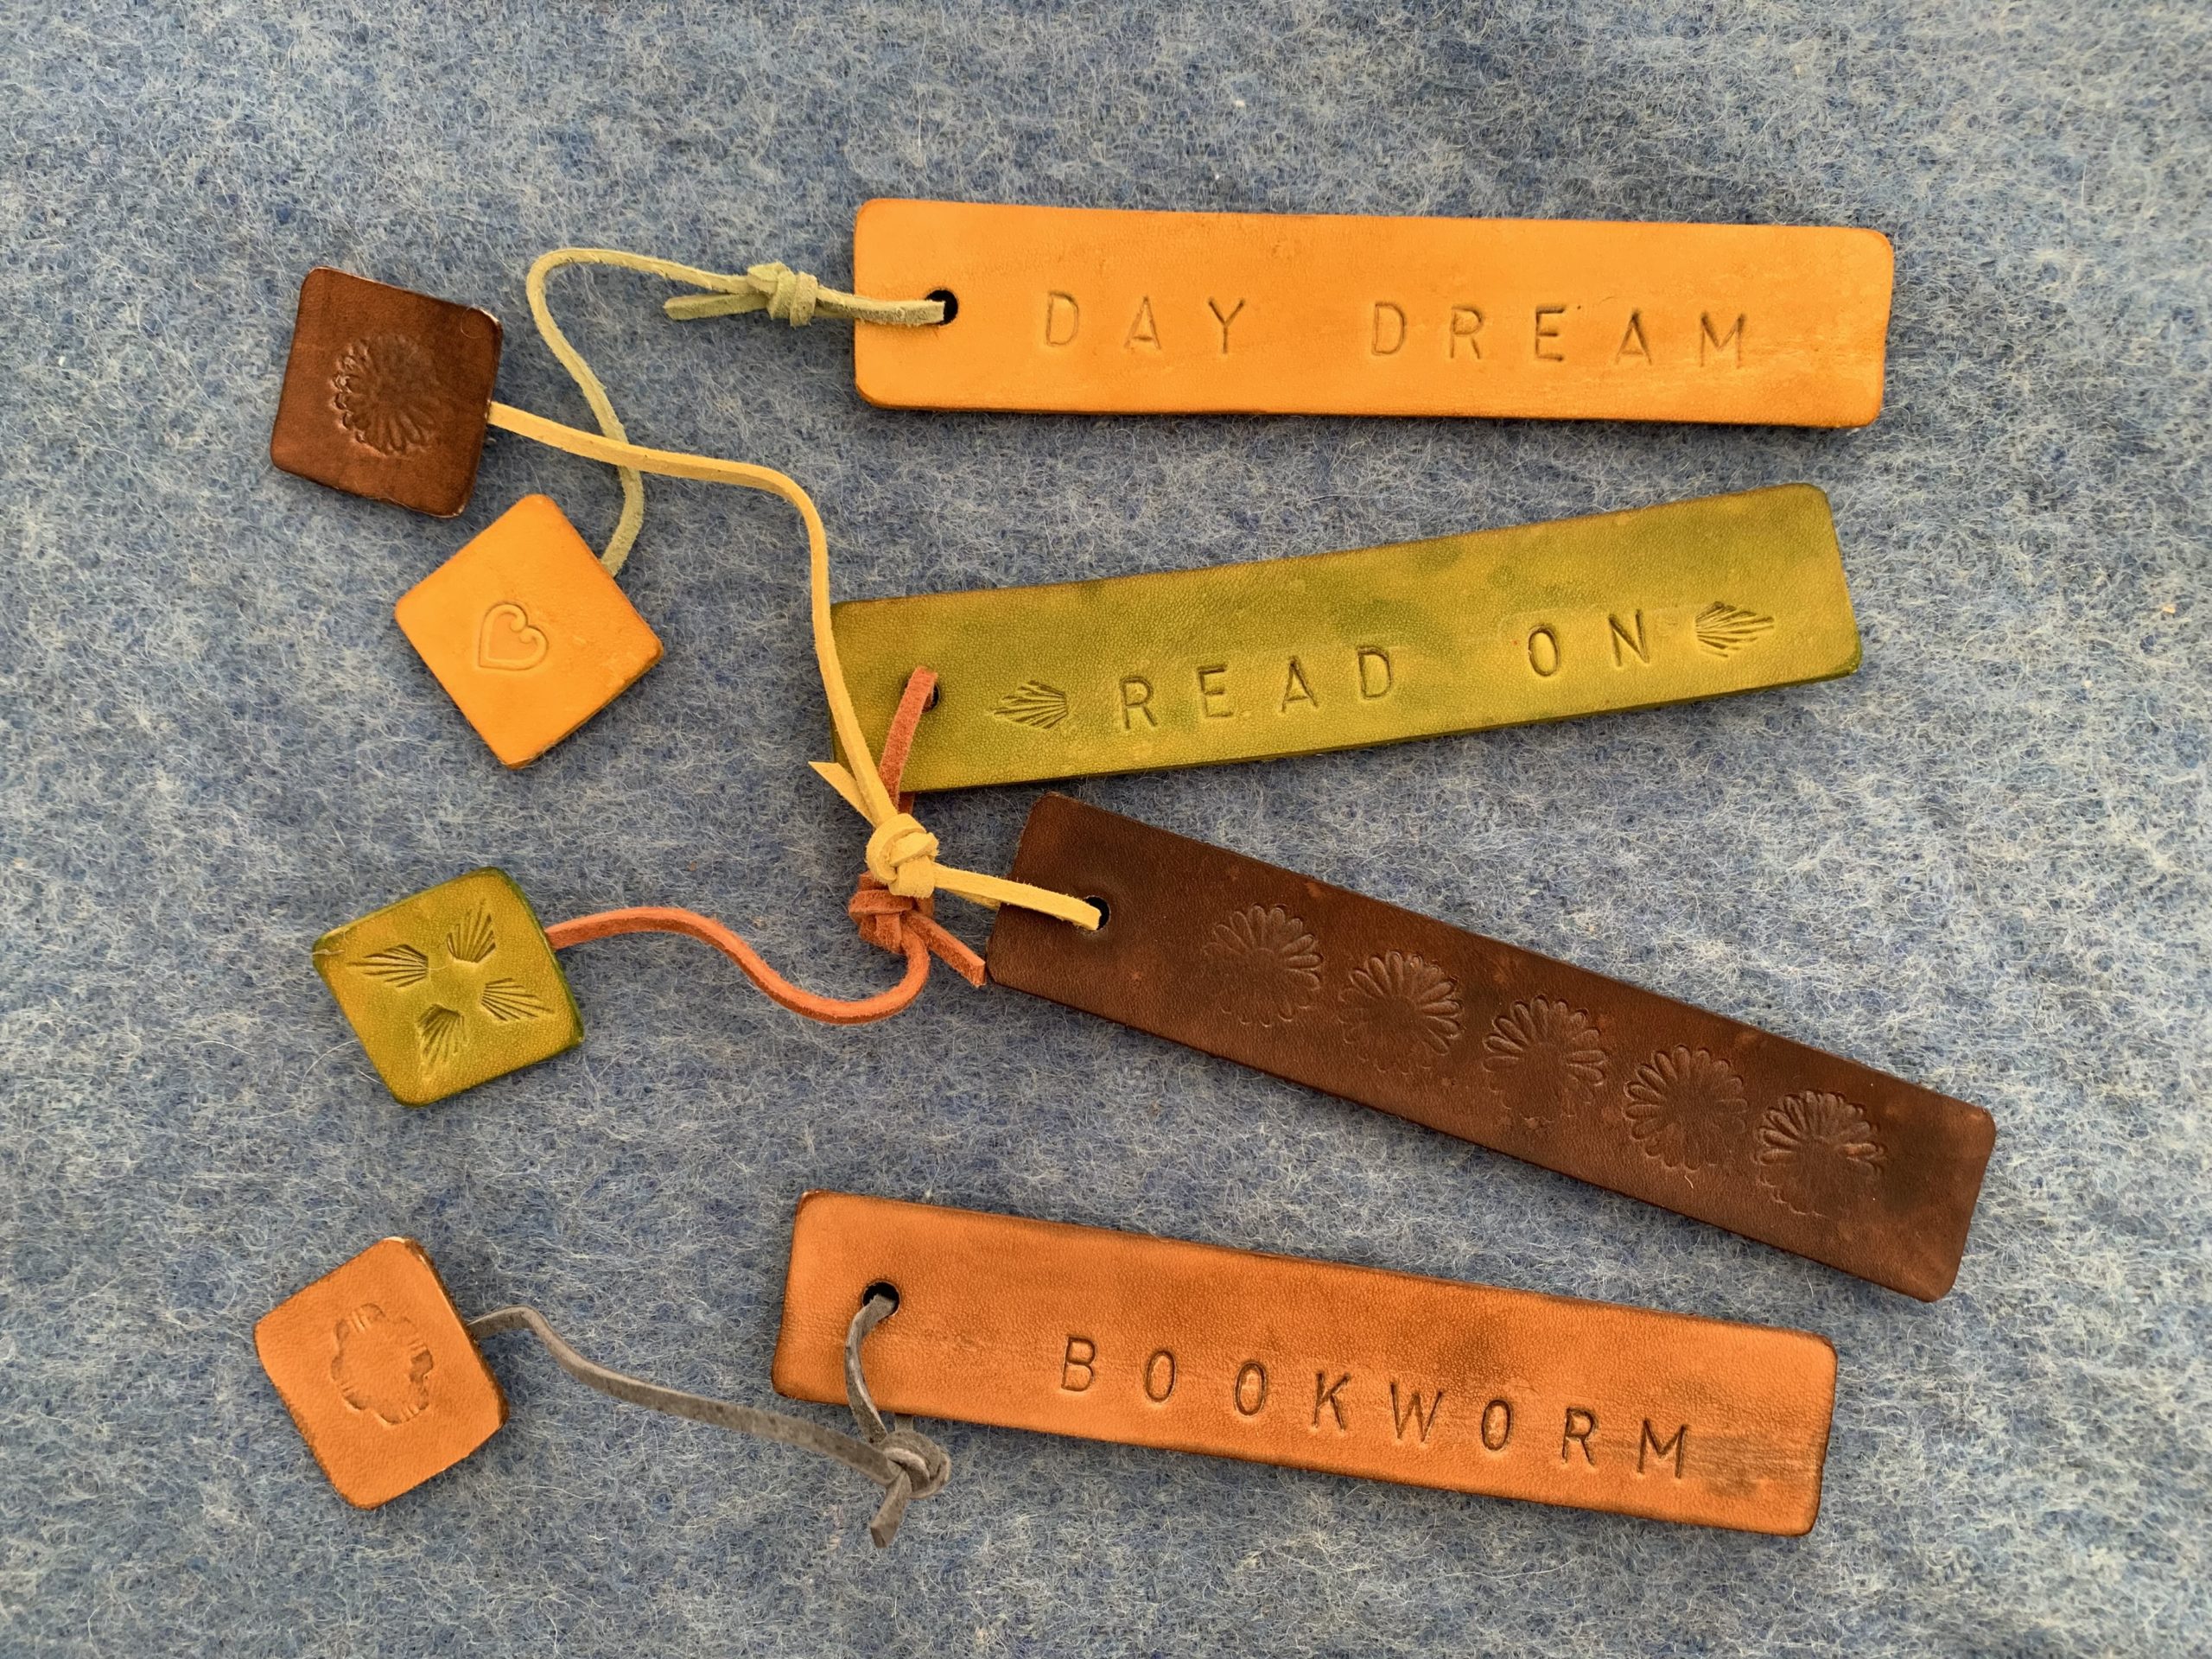
There’s nothing better than curling up on the couch with a good book after a long day. But it’s not so fun flipping through the pages trying to find where you left off. That’s where bookmarks come in handy. This DIY helps you create leather bookmarks that stand the test of time.
Supplies:
– Leather suede lace
– Black permanent pen
– Ruler
– Leather stamps of shapes and the alphabet
– Hammer
– Unstained cowhide scraps
– Leather cutting scissors
– Leather rotary punch
– Leather dye (colors used for this example were espresso brown, amber, and light green)
– Rubber gloves
– Rags
– Leather glue
How To:
- Measure and trace a 1” x 6” rectangle and a 1” x 1” square on the backside of a piece of cowhide.
- With leather scissors cut out both pieces.
- With the leather rotary punch, punch a hole (centered) on one end of the rectangle shape.
- Wear rubber gloves and with a rag, stain both pieces (front, back, and sides) with the desired color of dye. Let dry.
- Stamp a favorite word or shape design on the rectangle shape by hammering each stamp one at a time.
- Stamp a shape in the center of the square.
- Cut a piece of leather lace 8″ long.
- Thread one end of the lace through the hole of the rectangle piece and tie off.
- Glue the other end of the lace to the backside of the square.
Hide the Thermostat
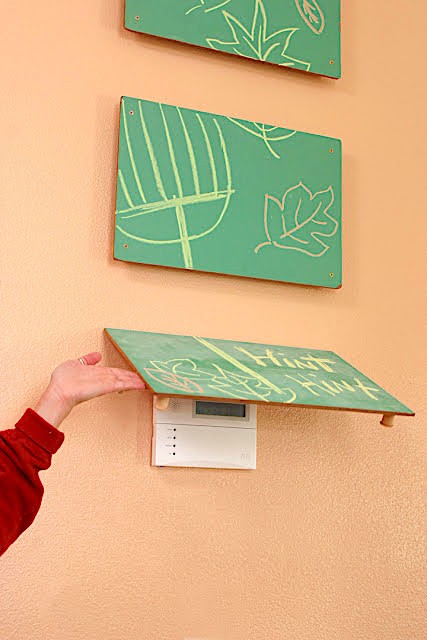
We all know thermostats are a must, but do they always have to be so noticeable? Let’s face it, they’re not attractive, and ironically even though they are small, they take up a lot of room. What’s the decorative DIY solution? Cover them up with your favorite midsize piece of artwork or chalkboard. It’s a decorative DIY win-win.
Supplies:
– 1’ x 2’ chalkboard or similar size of artwork. For this project we used a chalkboard.
– Miter saw
– 1” x 1” x 36” square wood dowel (Note: if your thermostat is deeper than a 1” dowel, use the appropriate dowel dimension that will allow spatial clearance for the chalkboard to lay flat over the thermostat.)
– 8” piano hinge with mounting screws
– Drill
– 1 ½” wood screws
– Level
– Wood glue
How To:
- Cut one 1” x 1” square wood dowel, 10” long.
- Cut two blocks 1” x 1” x 2” long from the same dowel.
- Close the piano hinge and place it center and parallel on top of the dowel.
- Open the hinge and screw the inside of the hinge into the dowel with the knuckle (the hinge’s bump) hanging over the dowel.
- Lay the chalkboard down, with the backside facing up.
- With the hinge opened, center the other side of it parallel and on top of the chalkboard. Make sure the knuckle is hanging over it. The knuckle will be between the chalkboard and the dowel.
- Screw the hinge into the backside of the chalkboard.
- Glue a wood block on each bottom corner of the backside of the chalkboard. Let dry.
- To locate where you want to mount the chalkboard, measure, level and mark a line on the wall. Recommend a few inches above the thermostat.
- Attach the chalkboard to the wall by lining up the dowel (with the hinge attached) on the line you made on the wall and mount it with wood screws.
- Once secured, gently lower the chalkboard over the thermostat.
Can’t get enough?
Click here to view past seasons of DIY with InRoads, featuring more money-saving DIY projects.
About the Author
 Shannon Quimby is an internationally acknowledged designer, photo stylist, television personality, and national guest speaker of home design/styling, salvage DIY and décor ideas. She’s an HGTV alumni and has been featured on NBC, CBS, ABC, and FOX broadcasts.
Visit shannonquimby.com for more on this DIY expert.